


Radiator thermostatic valve heads are core components for regulating room temperature. After prolonged use, problems such as valve head jamming, seal failure, or inaccurate temperature sensing may occur, leading to room temperature fluctuations or increased energy consumption. Replacing the valve head is an economical and effective way to solve these problems, eliminating the need to replace the entire valve and reducing costs by more than 50%. This article will detail the replacement steps, tool preparation, and precautions for radiator thermostatic valve heads, helping users complete the operation independently and improve heating comfort.
Tools and Materials Preparation: Precise Matching is Key
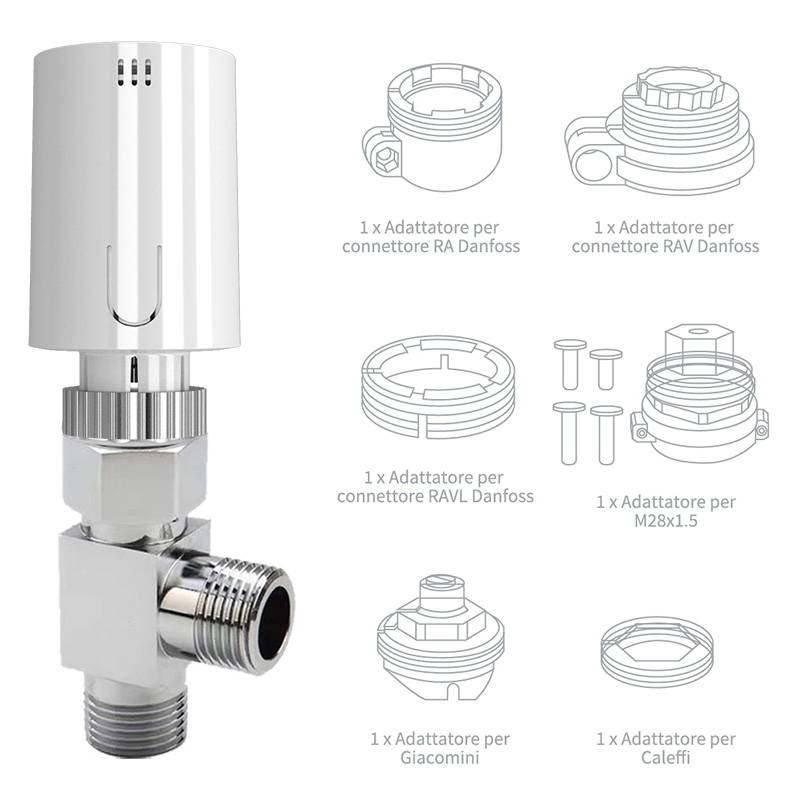
Before replacing the valve head, you need to prepare specialized tools and compatible materials. First, you need to confirm the original valve head interface type. Common specifications include M30×1.5 (European standard) and G1/2 (universal thread), which can be determined by measuring the outer diameter of the valve head thread or referring to the product manual. For tools, you will need an adjustable wrench (10-12 inches), Teflon tape (0.1mm thickness), silicone grease lubricant, and heat-resistant gloves. If the valve head is severely corroded, you can prepare a bottle of WD-40 rust remover to assist in disassembly.
Material selection requires careful consideration of compatibility. For example, due to the high coefficient of thermal expansion of cast iron radiators, brass valve heads (with strong corrosion resistance) are recommended; stainless steel valve heads (with better thermal conductivity) can be used for steel radiators. If the system water has a high oxygen content (such as in an open system), valve heads with an anti-oxidation coating should be selected to prevent internal corrosion and leakage.
Removing the Old Valve Head: Steps and Techniques
After closing the main valve of the heating system, wait for the radiator to cool to room temperature (to avoid burns) before starting to remove the old valve head. First, use an adjustable wrench to hold the valve body in place (avoid rotating the radiator), and rotate the valve head counterclockwise until it is completely detached. If the valve head is rusted and stuck, spray WD-40 rust remover, wait 5 minutes, and try again; if it still cannot be removed, gently tap the side of the valve head with a hammer (do not hit the thermostat) to loosen the threads with vibration.
After disassembly, check if the valve body threads are intact. If the threads are worn or have burrs, they need to be smoothed with a file; otherwise, leaks are likely after the new valve head is installed. Simultaneously clean impurities inside the valve body to prevent clogging of the temperature sensing element in the new valve head.
Installing the New Valve Head: Details Determine Sealing
Before installation, wrap 3-5 turns of Teflon tape (clockwise) around the threads of the new valve head, ensuring the first turn covers the root of the thread and the last turn extends 1-2mm beyond the thread end face. Too thin a layer of Teflon tape will cause leakage, while too thick a layer may result in improper valve head installation. Align the valve head with the valve body threads and rotate clockwise until it cannot be turned by hand. Then tighten with an adjustable wrench by 1/4 turn (the force should not damage the threads), avoiding excessive force that could crack the valve body.
For electric valve heads, connect the control cable and secure the cable clip to prevent poor contact. After installation, apply a small amount of silicone grease lubricant to the contact point between the valve stem and the valve body to reduce friction and extend service life. If the system uses individual metering, the temperature sensor parameters must be reset after valve head installation to ensure accurate data.
Debugging and Acceptance: Ensuring Normal Functionality
After installation, slowly open the main valve of the heating system and observe for leaks around the valve head. If leakage occurs, immediately close the valve, rewrap the PTFE tape, and tighten the valve head. After the system pressure stabilizes (usually 30 minutes), check the valve head’s operation: manually rotate the valve head to its maximum opening; you should feel hot water flowing when touching the valve stem; when rotated to its minimum opening, the radiator surface temperature should drop significantly.
Use a thermometer to measure the room temperature to verify the valve head’s temperature control accuracy. Set the valve head to 20℃; after the room temperature stabilizes, the actual temperature should be within the range of 19.5-20.5℃. If the deviation exceeds 1℃, the temperature bulb parameters need to be calibrated (some electric valve heads support APP calibration) or a higher precision valve head needs to be replaced.
Common Problem Handling: Quickly Resolve Installation Difficulties
If abnormal noise occurs after valve head installation, it may be due to excessive clearance between the valve stem and valve body. Apply silicone grease lubricant to the valve stem or replace with a compatible model. If the temperature sensing is delayed (the valve head does not activate promptly after a change in room temperature), check if the thermostat is obstructed (e.g., by curtains, furniture), or replace it with a faster-responding liquid thermostat valve head (liquid media has a higher coefficient of thermal expansion compared to paraffin thermostats).
For single-pipe systems, after replacing the valve head, check if the flow rate across the bypass pipes is balanced. If the bedroom radiator is too hot while the living room is too cold, the hydraulic imbalance can be resolved by adjusting the valve head’s flow split coefficient (three-way valve) or installing a balancing valve.
Self-replacing the thermostatic radiator valve head not only saves on maintenance costs but also improves living comfort through precise temperature control. Proper operation at each stage, from tool preparation to commissioning and acceptance, is crucial for ensuring stable system operation. Mastering this skill allows users to regularly check the valve head condition and replace aging parts promptly, ensuring the heating system always maintains optimal performance.